السبت، 20 ديسمبر 2014

How to Build High Quality Backlinks

One of the secrets to creating more web traffic with your posts is to build in some backlinks. To build high quality backlinks is one of the most popular methods to boost your content over the competition. However, finding the right methods to build the backlinks is going to take a little effort.

Everything starts with understanding what a backlink is and what it will do for your content. From there, you can then extend your efforts to build even more backlinks using creative and effective means that maximizes the potential of your content.

backlinks

What is a Backlink?

A backlink is an incoming hyperlink that connects the web page or content to another website. Backlinks are very important when it comes to page ranking as Google rates them highly. However, the backlinks themselves must be of good quality in order to generate the rankings needed to boost your content ahead of the competition.

Quality of the backlinks is important because having 10 good ones will beat 200 bad ones in terms of Google rankings. So, you must strive for quality each and every time. However, it will take time to build up backlinks to your articles because people will have to see it and then decide to link to it in order to add more value to their site.

If you look at adding good backlinks as a long term strategy, you will eventually reap the rewards that they offer. What follows are some interesting ways to start building good quality backlinks so that you can start your success today a little bit at a time.

Create Long, Interesting Posts

One of the easiest ways to start creating good backlinks is by writing a good, long tutorial post that uses images, charts and other graphics to really make it interesting. It will need to be from 1000 to 1200 words long and not have any filler, so the information really needs to be good and tight to make it interesting.

How-To guides often make the best long posts, especially if you can really hit the details so that people will fully understand how to do what you are explaining to them.

Participate in Forums

A person who is active in the forums when it comes to the subject that you are writing is building a network of potential fans who might offer high quality backlinks to their work. This is a delicate matter as you don't want to come across as someone only interested in what they can do for you. This will mean offering quality backlinks to those who participate in the forum as well if you find their articles useful and informative.

Write e-Books

An e-Book is one of the best ways to help spread the word about your talents and you can ask your friends to share it with the world through social media as well. You can also send your links to the best in social bookmarking sites as well to help augment your efforts.

With e-Books, you don't have to write very many, but it does help if you create ones that are very useful, highly readable and can be shared so that you can build high quality backlinks.

Create Special Days

One of the more interesting ways to build high quality backlinks is creating special days like St. Patrick's Day, Halloween or Valentine's Day to offer discounts on your products or services. You can actually build up to the day as well with special writing and content features to help pull in more traffic.

Remember, you'll need to do some research on your audience to see what type of holidays and content works best for their interest, but Valentine's Day is one that everyone shares, so that is an easy one to write good content, or run a contest that is bound to get good, high quality backlinks.

Have Free Products

Everyone likes free products and this can help you boost the number of visitors to your website. You can have a free e-Book or even a promotional gift if you want. While it may take some investment, the result will be getting more web traffic which in turn creates more demand for your products or services.

Videos

YouTube may very well be the biggest marketing tool of the moment with no signs of slowing down. If you can create a funny, interesting video then you will start getting some great backlinks. Today, the technology to create a solid, professional-looking video is dirt cheap compared to just a decade ago.

You can create "how-to" videos or find something interesting to make a video about as long as it relates to the industry in which your business is in. The key is to do something fun and enjoyable for your audience so that they will start sharing it with their friends.

Interact with Other Blogs

When you read a blog or see a video you like that is within your industry, don't just say "good job" and leave it at that. Write a good, interesting comment or review so that you can really share your thoughts. Remember to be positive, articulate and get right to the point. If you can write your thoughts in an entertaining, audience-pleasing way, you can start building up an audience for your comments and reviews.

Do Guest Blogging

Want to make a great impression? Find a good place to guest blog and write until you get that post to go viral. This will not only attract you an audience, but by helping out someone else you will build high quality backlinks as well.

It will take time, effort and the ability to write well. But if you can pull it off, your stint as a guest blogger will pay off big time for your efforts. The key is to write something that attracts people's attention and provides you with a place to write again for the blogger.

Guest blogging can be very rewarding in more ways than one, so if you have the time to do it right, then you should market your services as a guest blogger.

These are just some of the methods you can use to build high quality backlinks and start building up your web traffic.

الاثنين، 15 ديسمبر 2014

Show/Hide Blogger and Google+ Comments System With Toggle

Many Blogger site owners received the new Google+ Comment System pretty negatively because it forced all commenting users to create their own Google+ account before they were able to write a comment. The Google+ Comment System on Blogger was convenient to writers, but discouraged many users from continuing to comment on blogs because they simply didn't want to use Google+. For those that did use Google+ to make a comment, Blogger would never email you and notify you that someone left a comment; you could go days or weeks without ever realizing that you never responded to a reader.

In addition to frustrating your audience, the Google+ Comment System on Blogger depended upon the URL of your blog post. By changing your URLs or moving around your blog posts internally, you run the risk of losing every one of your comments that was placed using Google+.

Previously, the only way to solve this problem was to disable the comment system through your account settings, thus giving up your ability to use their Google+ account. Now, there's an easy new way to have the best of both worlds. Allowing fans of Google+ as well as everyday blog readers to access all same features, you’ll be able to engage every visitor equally. You can respond to comments while still being able to communicate with other Google+ users outside of your site and take advantage of the Google+ Comment System on Blogger.

google plus comments, blogger

How to Integrate Blogger and Google Plus Comments

To make the installation as simple as possible, I used inline jQuery and CSS, but who wants can change this code later. Also, the most accessible place I found to add it would be just after <b:include data='post' name='post'/>. So, let's start adding it:

Step 1. Log into your Blogger account and select your blog > go to 'Template' and press the 'Edit HTML' button on the right side.


Step 2. Click anywhere inside the code area and press CTRL + F keys to open the editor's search box and search for the following code:
<b:include data='post' name='post'/>
Step 3. Just after <b:include data='post' name='post'/> add the following code:
<b:if cond='data:blog.pageType == &quot;item&quot;'>
<style>#comments, #gplus-comments-visibility {display:none;} .comments-icons {background: url(https://blogger.googleusercontent.com/img/b/R29vZ2xl/AVvXsEjbbfvrKZjNbcqSFUGjcLSHNKg06LdxrBDk4QFgdSWxd8JnBTNncMN7NGf2O3y8DYiY3nSzcxJxik5TzAuIK15WCLsPCa8NXohYKWL4-j2mams6wugcCcZGM9QCabWSjRm4MaQ9qVX3pao7/s1600/speech-bubble.png) no-repeat; font-size: 20px; font-family: &quot;Arial Narrow&quot;,Arial,sans-serif; color: #555; font-weight: bold; padding: 18px 15px 0; height: 70px; } .comments-icons a img {vertical-align: middle;}</style>
<div class='comments-icons'>
Show Comments: <a class='show-hide-comments' href='javascript:void();' onclick='$(&quot;#gplus-comments-visibility&quot;).slideToggle();$(&quot;#comments&quot;).hide();'><img class='gplus-icon' height='35' src='https://blogger.googleusercontent.com/img/b/R29vZ2xl/AVvXsEhcbf7fsUTVjxFP7jFpo_16GjVCsA2gDM7Y7kz9Ft01Ko5Fgj7aXqbFU3exr7BQWlyiCRAclLwyy_7bmaEPuUMqp2nY2EELUdVrIwQHJgY5CtWtNAXhg80s1sFqs2m_0JI4PjVrDcVeeUq4/s1600/google-plus-logo.png' width='35'/></a> OR <a class='show-hide-comments' href='javascript:void();' onclick='$(&quot;#comments&quot;).slideToggle();$(&quot;#gplus-comments-visibility&quot;).hide();'><img class='blogger-icon' height='35' src='https://blogger.googleusercontent.com/img/b/R29vZ2xl/AVvXsEgYbmWXceYRSZSRmbONDsl0wTInXQVxxHgecTs62T9-w1AARUpOhSUWcG5G4CKupPwZkMR8leqzMJzlMhVSMDnqvkfWANOZGnDR0O57BLroRorj37THXbb2pW0FiAZyA4cFi9Nfzjpx8jif/s1600/blogger-logo.png' width='35'/></a>
</div>
<div id='gplus-comments-visibility'>
<div class='g-comments' data-first_party_property='BLOGGER' data-view_type='FILTERED_POSTMOD' data-width='550' expr:data-href='data:post.url'/>
</div>      
</b:if>
Note: The data-width is for setting the width of the comment box, so the number (550) indicated there can be changed according to the design of your blog.

Step 4. Press the "Save Template" button located at the top of the editor and view your blog to see if you have successfully added Google+ commenting system to Blogger.

Please note that in order to make this work, you need to make sure that you are using a version of jQuery in your site. Otherwise, add this line just above the </head> tag using the HTML template editor:
<script src='https://ajax.googleapis.com/ajax/libs/jquery/1.6.4/jquery.min.js' type='text/javascript'/>

That's it!

From here on out, any reader that views your post has the option of making a comment using their Google+ account, or the native Blogger comments. Your readers will enjoy the flexibility that your site provides and you will also benefit from the inclusive services offered by Google.

السبت، 15 نوفمبر 2014

5 Cool Recent Post Widgets for Blogger

For bloggers that pride themselves on always staying up-to-date with new content, a recent post widget for Blogger can be an invaluable tool. A recent post widget for blogger is in many ways similar to a 'breaking news alert' that journalists love to use during their reports, providing the most recent and relevant posts that you have to offer.

Adding a recent post widget for Blogger helps to reduce the dependency on email marketing, because you don't have to send out an email just to let people know you made a new post. Instead, it updates automatically for everyone to see. You can then use this information to design scheduled email newsletters, and take advantage of what's often referred to as the 'Twitter effect' where audiences will regularly check back on your site for the possibility that new posts are available. Without this, you force people to do run their own search for information and content, increasing the likelihood that they'll leave the site and hurt your bounce rate.

Once you've managed to attract visitors to one of your posts using the recent post widget for Blogger, it will continue to act as an accessible secondary resource to navigate around your site. That way, you can avoid having them sifting through old content that might be outdated. If you'd rather show off some of your best posts instead of your most recent posts, you can do that instead, or add that feature to the bar with just a few alterations.

Apart from looking great and taking up minimal space, there are too many benefits for you not to have a recent post widget for Blogger. The best part about these add-ons is that they come in a wide variety of designs that will fit any theme. If you're interested in adding a widget to your site, here are 5 cool recent post widgets that might catch your eye and fit perfectly with your Blogger template:
recent posts for blogger, cool widgets

Style #1

rainbow widget, recent posts
<script type="text/javascript">
function showlatestpostswiththumbs(t){document.write('<ul class="recent-posts-container">');for(var e=0;e<posts_no;e++){var r,n=t.feed.entry[e],i=n.title.$t;if(e==t.feed.entry.length)break;for(var o=0;o<n.link.length;o++){if("replies"==n.link[o].rel&&"text/html"==n.link[o].type)var l=n.link[o].title,m=n.link[o].href;if("alternate"==n.link[o].rel){r=n.link[o].href;break}}var u;try{u=n.media$thumbnail.url}catch(h){s=n.content.$t,a=s.indexOf("<img"),b=s.indexOf('src="',a),c=s.indexOf('"',b+5),d=s.substr(b+5,c-b-5),u=-1!=a&&-1!=b&&-1!=c&&""!=d?d:"https://blogger.googleusercontent.com/img/b/R29vZ2xl/AVvXsEgrXw5TojyioyfVlOFaEishGuxPS8kA0zt2jDOXPjAePeP2QgZeNGWI7PcoOPpX0GxcHJydPXJC47VThsz0XFTy8aKOgryoigBx7fD3akgr8_3h9K2q-Q7_OCUZb_omuGM3xXQaNtuWyXEJ/s1600/no-thumb.png"}var p=n.published.$t,f=p.substring(0,4),g=p.substring(5,7),v=p.substring(8,10),w=new Array;if(w[1]="Jan",w[2]="Feb",w[3]="Mar",w[4]="Apr",w[5]="May",w[6]="Jun",w[7]="Jul",w[8]="Aug",w[9]="Sep",w[10]="Oct",w[11]="Nov",w[12]="Dec",document.write('<li class="recent-posts-list">'),1==showpoststhumbs&&document.write('<a href="'+r+'"><img class="recent-post-thumb" src="'+u+'"/></a>'),document.write('<div class="recent-post-title"><a href="'+r+'" target ="_top">'+i+"</a></div>"),"content"in n)var A=n.content.$t;else if("summary"in n)var A=n.summary.$t;else var A="";var k=/<\S[^>]*>/g;if(A=A.replace(k,""),1==post_summary)if(A.length<summary_chars)document.write(A);else{A=A.substring(0,summary_chars);var y=A.lastIndexOf(" ");A=A.substring(0,y),document.write(A+"...")}var _="",$=0;document.write('<br><div class="recent-posts-details">'),1==posts_date&&(_=_+w[parseInt(g,10)]+" "+v+" "+f,$=1),1==readmorelink&&(1==$&&(_+=" | "),_=_+'<a href="'+r+'" class="url" target ="_top">Read more</a>',$=1),1==showcommentslink&&(1==$&&(_+=" <br> "),"1 Comments"==l&&(l="1 Comment"),"0 Comments"==l&&(l="No Comments"),l='<a href="'+m+'" target ="_top">'+l+"</a>",_+=l,$=1),document.write(_),document.write("</div>"),document.write("</li>")}document.write("</ul>")}
</script>
<script type="text/javascript">
var posts_no = 5;
var showpoststhumbs = true;
var readmorelink = true;
var showcommentslink = false;
var posts_date = true;
var post_summary = true;
var summary_chars = 70;
</script>
<script src="/feeds/posts/default?orderby=published&alt=json-in-script&callback=showlatestpostswiththumbs"></script>
<a style="font-size: 9px; color: #CECECE; margin-top: 10px;" href="http://helplogger.blogspot.com/2014/11/5-cool-recent-post-widgets-for-blogger.html" rel="nofollow">Recent Posts Widget</a>
<noscript>Your browser does not support JavaScript!</noscript>
<link href='http://fonts.googleapis.com/css?family=Ubuntu+Condensed' rel='stylesheet' type='text/css' />
<style type="text/css">
img.recent-post-thumb{width:50px;height:50px;float:right;margin:5px -5px 0px 0px;-webkit-border-radius:50%;-moz-border-radius:50%;border-radius:50%;padding:3px;background: #fff}
ul.recent-posts-container {list-style-type: none; background: #fff;padding: 0px;font:12px 'Ubuntu Condensed', sans-serif;margin: 5px 0px 5px 0px;}
ul.recent-posts-container li:nth-child(1n+0) {background: #F49A9A; width: 100%}
ul.recent-posts-container li:nth-child(2n+0) {background: #FCD092; width: 95%}
ul.recent-posts-container li:nth-child(3n+0) {background: #FFF59E; width: 90%;}
ul.recent-posts-container li:nth-child(4n+0) {background: #E1EFA0; width: 85%;}
ul.recent-posts-container li:nth-child(5n+0) {background: #B1DAEF; width: 80%;}
ul.recent-posts-container li {padding:5px 10px;list-style-type: none; margin: 0 0 -5px; color: #777;}
.recent-posts-container a { text-decoration:none; }
.recent-posts-container a:hover { color: #222;}
.post-date {color:#e0c0c6; font-size: 11px; }
.recent-post-title a {font-size: 14px;color: #444; font-weight: bold;}
.recent-post-title {padding: 6px 0px;}
.recent-posts-details a{ color: #222;}
.recent-posts-details {padding: 5px 0px 5px; }
</style>

Style #2

recent posts widget
<div class="recentpoststyle">
<script type="text/javascript">
function showlatestposts(e){for(var t=0;t<posts_no;t++){var r,s=e.feed.entry[t],n=s.title.$t;if(t==e.feed.entry.length)break;for(var a=0;a<s.link.length;a++)if("alternate"==s.link[a].rel){r=s.link[a].href;break}n=n.link(r);var i="... read more";i=i.link(r);var l=s.published.$t,o=l.substring(0,4),u=l.substring(5,7),c=l.substring(8,10),m=new Array;if(m[1]="Jan",m[2]="Feb",m[3]="Mar",m[4]="Apr",m[5]="May",m[6]="Jun",m[7]="Jul",m[8]="Aug",m[9]="Sep",m[10]="Oct",m[11]="Nov",m[12]="Dec","content"in s)var d=s.content.$t;else if("summary"in s)var d=s.summary.$t;else var d="";var v=/<\S[^>]*>/g;if(d=d.replace(v,""),document.write('<li class="recent-post-title">'),document.write(n),document.write('</li><div class="recent-post-summ">'),1==post_summary)if(d.length<summary_chars)document.write(d);else{d=d.substring(0,summary_chars);var f=d.lastIndexOf(" ");d=d.substring(0,f),document.write(d+" "+i)}document.write("</div>"),1==posts_date&&document.write('<div class="post-date">'+m[parseInt(u,10)]+" "+c+" "+o+"</div>")}}
</script>
<script type="text/javascript">
var posts_no = 5;var posts_date = true;var post_summary = true;var summary_chars = 80;</script>
<script src="/feeds/posts/default?orderby=published&amp;alt=json-in-script&amp;callback=showlatestposts">
</script><a style="font-size: 9px; color: #CECECE;margin-top:10px;" href="http://helplogger.blogspot.com/2014/11/5-cool-recent-post-widgets-for-blogger.html" rel="nofollow">Recent Posts Widget</a>
<noscript>Your browser does not support JavaScript!</noscript>
<style type="text/css">
.recentpoststyle {counter-reset: countposts;list-style-type: none;}
.recentpoststyle a {text-decoration: none;color: #49A8D1;}
.recentpoststyle a:hover {color: #000;}
.recentpoststyle li:before {content: counter(countposts,decimal);counter-increment: countposts;float: left;z-index: 1;position:relative;font-size: 15px;font-weight: bold;color:#fff;background:#69B7E2; margin:13px 5px 0px -6px;line-height:30px;width:30px;height:30px;text-align:center;-webkit-border-radius:50%;-moz-border-radius:50%;border-radius:50%;}li.recent-post-title{margin-bottom: 5px;padding: 0;}
.recent-post-title a {color: #444;text-decoration: none;font: bold 13px "Avant Garde",Avantgarde,"Century Gothic",CenturyGothic,AppleGothic,sans-serif;}
.post-date {font-size: 11px;color: #999;margin:5px 0px 15px 32px;}
.recent-post-summ {border-left:1px solid #69B7E2; color: #777; padding: 0px 5px 0px 20px; margin-left: 10px; font: 15px Garamond,Baskerville,"Baskerville Old Face","Hoefler Text","Times New Roman",serif;}
</style></div>

Style #3

recent posts gadget

<script type="text/javascript">
function showlatestpostswiththumbs(t){document.write('<ul class="recent-posts-container">');for(var e=0;e<posts_no;e++){var r,n=t.feed.entry[e],i=n.title.$t;if(e==t.feed.entry.length)break;for(var o=0;o<n.link.length;o++){if("replies"==n.link[o].rel&&"text/html"==n.link[o].type)var l=n.link[o].title,m=n.link[o].href;if("alternate"==n.link[o].rel){r=n.link[o].href;break}}var u;try{u=n.media$thumbnail.url}catch(h){s=n.content.$t,a=s.indexOf("<img"),b=s.indexOf('src="',a),c=s.indexOf('"',b+5),d=s.substr(b+5,c-b-5),u=-1!=a&&-1!=b&&-1!=c&&""!=d?d:"https://blogger.googleusercontent.com/img/b/R29vZ2xl/AVvXsEgrXw5TojyioyfVlOFaEishGuxPS8kA0zt2jDOXPjAePeP2QgZeNGWI7PcoOPpX0GxcHJydPXJC47VThsz0XFTy8aKOgryoigBx7fD3akgr8_3h9K2q-Q7_OCUZb_omuGM3xXQaNtuWyXEJ/s1600/no-thumb.png"}var p=n.published.$t,f=p.substring(0,4),g=p.substring(5,7),v=p.substring(8,10),w=new Array;if(w[1]="Jan",w[2]="Feb",w[3]="Mar",w[4]="Apr",w[5]="May",w[6]="Jun",w[7]="Jul",w[8]="Aug",w[9]="Sep",w[10]="Oct",w[11]="Nov",w[12]="Dec",document.write('<li class="recent-posts-list">'),1==showpoststhumbs&&document.write('<a href="'+r+'"><img class="recent-post-thumb" src="'+u+'"/></a>'),document.write('<div class="recent-post-title"><a href="'+r+'" target ="_top">'+i+"</a></div>"),"content"in n)var A=n.content.$t;else if("summary"in n)var A=n.summary.$t;else var A="";var k=/<\S[^>]*>/g;if(A=A.replace(k,""),1==post_summary)if(A.length<summary_chars)document.write(A);else{A=A.substring(0,summary_chars);var y=A.lastIndexOf(" ");A=A.substring(0,y),document.write(A+"...")}var _="",$=0;document.write('<br><div class="recent-posts-details">'),1==posts_date&&(_=_+w[parseInt(g,10)]+" "+v+" "+f,$=1),1==readmorelink&&(1==$&&(_+=" | "),_=_+'<a href="'+r+'" class="url" target ="_top">Read more</a>',$=1),1==showcommentslink&&(1==$&&(_+=" <br> "),"1 Comments"==l&&(l="1 Comment"),"0 Comments"==l&&(l="No Comments"),l='<a href="'+m+'" target ="_top">'+l+"</a>",_+=l,$=1),document.write(_),document.write("</div>"),document.write("</li>")}document.write("</ul>")}
</script>
<script type="text/javascript">
var posts_no = 5;
var showpoststhumbs = true;
var readmorelink = true;
var showcommentslink = true;
var posts_date = true;
var post_summary = true;
var summary_chars = 40;</script>
<script src="/feeds/posts/default?orderby=published&alt=json-in-script&callback=showlatestpostswiththumbs"></script>
<a style="font-size: 9px; color: #CECECE; margin-top: 10px;" href="http://helplogger.blogspot.com/2014/11/5-cool-recent-post-widgets-for-blogger.html" rel="nofollow">Recent Posts Widget</a>
<noscript>Your browser does not support JavaScript!</noscript>
<link href='http://fonts.googleapis.com/css?family=Oswald' rel='stylesheet' type='text/css'/>
<style type="text/css">
img.recent-post-thumb{padding:2px;width:65px;height:65px;float:left;margin:0px 10px 10px;border: 1px solid #69B7E2;}
.recent-posts-container {font-family:'Oswald', sans-serif;font-size:12px;}
ul.recent-posts-container li{list-style-type: none; margin-bottom: 10px;font-size:12px;float:left;width:100%}
ul.recent-posts-container {counter-reset: countposts;list-style-type:none;padding:0;}
ul.recent-posts-container li:before {content: counter(countposts,decimal);counter-increment: countposts;z-index: 1;position:absolute; left: 0px; font-size: 13px;font-weight: bold;color: #fff;background: #69B7E2;line-height:25px;height:25px;width:25px;text-align:center;-webkit-border-radius: 50%;-moz-border-radius: 50%;border-radius: 50%;}
.recent-posts-container a{text-decoration:none;}
.recent-post-title {margin-bottom:5px;}
.recent-post-title a {font-size:12px; text-transform: uppercase; color: #2aace3;}
.recent-posts-details {margin: 5px 0px 0px 92px;font-size:11px;}
.recent-posts-details a{color: #777;}
</style>

Style #4

recent posts for blogger, cool widgets
<script type="text/javascript">
function showlatestpostswiththumbs(t){document.write('<ul class="recent-posts-container">');for(var e=0;e<posts_no;e++){var r,n=t.feed.entry[e],i=n.title.$t;if(e==t.feed.entry.length)break;for(var o=0;o<n.link.length;o++){if("replies"==n.link[o].rel&&"text/html"==n.link[o].type)var l=n.link[o].title,m=n.link[o].href;if("alternate"==n.link[o].rel){r=n.link[o].href;break}}var u;try{u=n.media$thumbnail.url}catch(p){s=n.content.$t,a=s.indexOf("<img"),b=s.indexOf('src="',a),c=s.indexOf('"',b+5),d=s.substr(b+5,c-b-5),u=-1!=a&&-1!=b&&-1!=c&&""!=d?d:"https://blogger.googleusercontent.com/img/b/R29vZ2xl/AVvXsEgrXw5TojyioyfVlOFaEishGuxPS8kA0zt2jDOXPjAePeP2QgZeNGWI7PcoOPpX0GxcHJydPXJC47VThsz0XFTy8aKOgryoigBx7fD3akgr8_3h9K2q-Q7_OCUZb_omuGM3xXQaNtuWyXEJ/s1600/no-thumb.png"}var h=n.published.$t,f=h.substring(0,4),w=h.substring(5,7),v=h.substring(8,10),A=new Array;A[1]="Jan",A[2]="Feb",A[3]="Mar",A[4]="Apr",A[5]="May",A[6]="Jun",A[7]="Jul",A[8]="Aug",A[9]="Sep",A[10]="Oct",A[11]="Nov",A[12]="Dec",document.write('<li class="recent-posts-list">'),1==posts_date&&document.write('<div class="post-date">'+A[parseInt(w,10)]+" "+v+" "+f+"</div>"),1==showpoststhumbs&&document.write('<a href="'+r+'"><img class="recent-post-thumb" src="'+u+'"/></a>'),document.write('<div class="recent-post-title"><a href="'+r+'" target ="_top">'+i+"</a></div>");var g="",k=0;document.write('<div class="recent-posts-details">'),1==showcommentslink&&(1==k&&(g+=" <br> "),"1 Comments"==l&&(l="1 Comment"),"0 Comments"==l&&(l="No Comments"),l='<a href="'+m+'" target ="_top">'+l+"</a>",g+=l,k=1),1==readmorelink&&(1==k&&(g+=" | "),g=g+'<a class="readmorelink" href="'+r+'" class="url" target ="_top">Read more</a>',k=1),document.write(g),document.write("</div>"),document.write("</li>")}document.write("</ul>")}
</script>
<script type="text/javascript">
var posts_no = 5;
var showpoststhumbs = false;
var readmorelink = true;
var showcommentslink = true;
var posts_date = true;
</script>
<script src="/feeds/posts/default?orderby=published&alt=json-in-script&callback=showlatestpostswiththumbs"></script>
<a style="font-size: 9px; color: #CECECE; float: right; margin-top: 5px;" href="http://helplogger.blogspot.com/2014/11/5-cool-recent-post-widgets-for-blogger.html">Recent Posts Widget</a>
<noscript>Your browser does not support JavaScript!</noscript>
<link href='http://fonts.googleapis.com/css?family=Oswald' rel='stylesheet' type='text/css'/>
<style type="text/css">
img.recent-post-thumb {padding: 2px; width:35px;height:35px;float:right;margin: -14px 0px 0px 5px; border: 1px solid #cea5ac; border-radius: 10%;}
.recent-posts-container {font-family: 'Oswald', sans-serif;  float: left;width: 100%;min-height: 70px;margin: 5px 0px 5px 0px;padding: 0;font-size:12px;}
ul.recent-posts-container li {padding:5px 0px;min-height:65px; list-style-type: none; margin: 0px 10px 5px 35px;}
ul.recent-posts-container {counter-reset: countposts;list-style-type: none;}
ul.recent-posts-container li:before {content: counter(countposts,decimal);counter-increment: countposts;z-index: 2;position:absolute; left: 5px; font-size: 16px;color: #4D4D4D;background: #F7F7F7;padding: 9px 14px; border: 1px solid #efefef;}
.recent-posts-container a { text-decoration:none; }
.recent-posts-container a:hover{color: #4DACE3;}
.post-date {color:#e0c0c6; font-size: 11px; }
.recent-post-title a {font-size: 13px; text-transform: uppercase; color: #5C4D4D;}
.recent-post-title { margin: 5px 0px; }
.recent-posts-details {border-top: 4px solid #AC707A; margin-top: 5px; padding-top: 5px;}
.recent-posts-details a{ color: #888;}
a.readmorelink {color: #4DACE3;}
</style>

Style #5

recent posts, blogger gadget
<script type="text/javascript">
function showlatestpostswiththumbs(t){document.write('<ul class="recent-posts-container">');for(var e=0;e<posts_no;e++){var r,n=t.feed.entry[e],i=n.title.$t;if(e==t.feed.entry.length)break;for(var o=0;o<n.link.length;o++){if("replies"==n.link[o].rel&&"text/html"==n.link[o].type)var l=n.link[o].title,m=n.link[o].href;if("alternate"==n.link[o].rel){r=n.link[o].href;break}}var u;try{u=n.media$thumbnail.url}catch(p){s=n.content.$t,a=s.indexOf("<img"),b=s.indexOf('src="',a),c=s.indexOf('"',b+5),d=s.substr(b+5,c-b-5),u=-1!=a&&-1!=b&&-1!=c&&""!=d?d:"https://blogger.googleusercontent.com/img/b/R29vZ2xl/AVvXsEgrXw5TojyioyfVlOFaEishGuxPS8kA0zt2jDOXPjAePeP2QgZeNGWI7PcoOPpX0GxcHJydPXJC47VThsz0XFTy8aKOgryoigBx7fD3akgr8_3h9K2q-Q7_OCUZb_omuGM3xXQaNtuWyXEJ/s1600/no-thumb.png"}var h=n.published.$t,f=h.substring(0,4),w=h.substring(5,7),v=h.substring(8,10),A=new Array;A[1]="Jan",A[2]="Feb",A[3]="Mar",A[4]="Apr",A[5]="May",A[6]="Jun",A[7]="Jul",A[8]="Aug",A[9]="Sep",A[10]="Oct",A[11]="Nov",A[12]="Dec",document.write('<li class="recent-posts-list">'),1==posts_date&&document.write('<div class="post-date">'+A[parseInt(w,10)]+" "+v+" "+f+"</div>"),1==showpoststhumbs&&document.write('<a href="'+r+'"><img class="recent-post-thumb" src="'+u+'"/></a>'),document.write('<div class="recent-post-title"><a href="'+r+'" target ="_top">'+i+"</a></div>");var g="",k=0;document.write('<div class="recent-posts-details">'),1==showcommentslink&&(1==k&&(g+=" <br> "),"1 Comments"==l&&(l="1 Comment"),"0 Comments"==l&&(l="No Comments"),l='<a href="'+m+'" target ="_top">'+l+"</a>",g+=l,k=1),1==readmorelink&&(1==k&&(g+=" | "),g=g+'<a class="readmorelink" href="'+r+'" class="url" target ="_top">Read more</a>',k=1),document.write(g),document.write("</div>"),document.write("</li>")}document.write("</ul>")}
</script>
<script type="text/javascript">
var posts_no = 5;
var showpoststhumbs = true;
var readmorelink = true;
var showcommentslink = true;
var posts_date = true;
</script>
<script src="/feeds/posts/default?orderby=published&alt=json-in-script&callback=showlatestpostswiththumbs" rel="nofollow"></script>
<a style="font-size: 9px; color: #CECECE; float: right; margin-top: 5px;" href="http://helplogger.blogspot.com/2014/11/5-cool-recent-post-widgets-for-blogger.html" rel="nofollow">Recent Posts Widget</a>
<noscript>Your browser does not support JavaScript!</noscript>
<link href='http://fonts.googleapis.com/css?family=Lobster|Gloria+Hallelujah' rel='stylesheet' type='text/css' />
<style type="text/css">
img.recent-post-thumb {width:50px;height:50px;float:right;margin: -4px -35px 0px 0px; border: 4px solid #FCD6CB; border-radius: 100%;}
.recent-posts-container {font-family: 'Gloria Hallelujah', cursive;  float: left;width: 100%;min-height: 55px;margin: 5px 0px 5px 0px;padding: 0;font-size:12px;}
ul.recent-posts-container {counter-reset: countposts;list-style-type: none; background: #fff; }
ul.recent-posts-container li:before {content: counter(countposts,decimal);counter-increment: countposts;z-index: 2;position:absolute; left: -20px; font-size: 16px;color: #616662;background: #FCD6CB;padding: 9px 14px; border-radius: 100%; margin-top: 15px;}
ul.recent-posts-container li {padding:5px 0px;min-height:50px; list-style-type: none; margin: -2px 5px 5px 5px;  border-top: 2px solid #FCD6CB;}
ul.recent-posts-container {border: 2px solid #FCD6CB; }
.recent-posts-container a { text-decoration:none; }
.recent-posts-container a:hover { color: #222;}
.post-date {color:#e0c0c6; font-size: 11px; }
.recent-post-title a {font-size: 14px;color: #616662;}
.recent-post-title {padding: 6px 0px;}
.recent-posts-details a{ color: #888;}
.recent-posts-details {padding-bottom: 5px;}
a.readmorelink {color: #4DACE3;}
</style>

How to Add Recent Posts Widget on Blogger

Want to add one of the styles above? Just follow the following steps below:

Step 1. Log in to your Blogger dashboard and click on your blog
Step 2. Go to "Layout" and click the "Add a gadget" link on the right side
Step 3. From the pop-up window, scroll down and select the "HTML/JavaScript" gadget:


Step 4. Paste the code of the chosen widget found below it.
Step 5. Hit the "Save" button... and that's it!

Keep Your Blog Updated

Using a recent post widget for Blogger can truly benefit you and improve your skill as a blogger. As you can see, these designs can look great on Blogger sites, but they do act a little bit like a progress report for the author. If you start to fall behind, the dates on your recent post widget will definitely give you away.

Set a schedule and make sure that you are making regular posts on the blog. These posts will be automatically updated on your widget and readers can view this information whenever they want. Add your recent post widget for Blogger on the every page of the blog or in your template so that these posts can encourage others to continue reading, thus increasing the total time spent on your site.

الأحد، 19 أكتوبر 2014

Add 6 Stylish Custom Search Boxes To Blogger

There's an unspoken rule in the world of web design that says that every website have a search box. You can, and should, design a custom search gadget to Blogger that contributes to the theme of your site while providing some key benefits to both your customers and you.

Benefits to Customers

Search boxes not only help to increase your website's design usability, but they're very convenient to site visitors and regulars. For those that have been to your site before, they know what they want and they want it now. These are the impatient people who don't feel like wading through different links. If you don't accommodate this problem you might risk losing those readers.

For newer customers who want to get a feel for your site before investing any more time, it gives them the chance to look for their interests on both eCommerce sites and blog sites.

Benefits To You

Adding a custom search gadget to Blogger perhaps best benefit eCommerce sites because it's an industry that inherently offers a lot of very specific products. For instance, if you sold clothing apparel and someone was only look for shirts, the search would result would only bring up shirts so that person can look through everything in one place.

Bloggers might not have products to offer, but adding a custom search gadget to Blogger can help site analytics and SEO. Google Analytics offers a tool that will track all the searches performed by your search bar, so that you can use this data when improving your keyword usage and content choices. Google web crawlers and search engine bots will also test out phrases in these boxes on the rare occasion to make sure that all your content leads to somewhere creates a closed loop.

Add Your Own Custom Search Gadget To Blogger

Just because you should have a search bar doesn't mean you you're restricted to what time. Your site's search bar should be easy to find and readily available whenever someone needs it, but other than that the look of the design is up to you. If you want to add a custom search gadget to Blogger, here are 6 stylish choices to pick from. Just copy the code below the search box that you want to add and follow the steps below:

<style>
#searchbox {
    background: #d8d8d8;
    border: 4px solid #e8e8e8;
    padding: 20px 10px;
    width: 250px;
}

input:focus::-webkit-input-placeholder {
    color: transparent;
}

input:focus:-moz-placeholder {
    color: transparent;
}

input:focus::-moz-placeholder {
    color: transparent;
}

#searchbox input {
    outline: none;
}

#searchbox input[type="text"] {
    background: url(https://blogger.googleusercontent.com/img/b/R29vZ2xl/AVvXsEi0UOzkdZZN-Go1pw-wKxwmdexJ9oREGd09JGx3WZqy0mEkjklET0NpJcbGN0Rdvxj2CNwQ-DRdEYyDqfMlRgEL7fx9uuuEEsQtcgiuof1aJPOyB8RCrbrHZE5KVch6xrUdYS3UooK6sPp6/s1600/search-dark.png) no-repeat 10px 6px #fff;
    border-width: 1px;
    border-style: solid;
    border-color: #fff;
    font: bold 12px Arial,Helvetica,Sans-serif;
    color: #bebebe;
    width: 55%;
    padding: 8px 15px 8px 30px;
}

#button-submit {
    background: #6A6F75;
    border-width: 0px;
    padding: 9px 0px;
    width: 23%;
    cursor: pointer;
    font: bold 12px Arial, Helvetica;
    color: #fff;
    text-shadow: 0 1px 0 #555;
}

#button-submit:hover {
    background: #4f5356;
}

#button-submit:active {
    background: #5b5d60;
    outline: none;
}

#button-submit::-moz-focus-inner {
    border: 0;
}
</style>

<form id="searchbox" method="get" action="/search">
<input name="q" type="text" size="15" placeholder="Type here..." />
<input id="button-submit" type="submit" value="Search" />
</form>
<style>
#searchbox {
width: 240px;
}
#searchbox input {
    outline: none;
}
input:focus::-webkit-input-placeholder {
    color: transparent;
}
input:focus:-moz-placeholder {
    color: transparent;
}
input:focus::-moz-placeholder {
    color: transparent;
}
#searchbox input[type="text"] {
    background: url(https://blogger.googleusercontent.com/img/b/R29vZ2xl/AVvXsEi0UOzkdZZN-Go1pw-wKxwmdexJ9oREGd09JGx3WZqy0mEkjklET0NpJcbGN0Rdvxj2CNwQ-DRdEYyDqfMlRgEL7fx9uuuEEsQtcgiuof1aJPOyB8RCrbrHZE5KVch6xrUdYS3UooK6sPp6/s1600/search-dark.png) no-repeat 10px 13px #f2f2f2;
border: 2px solid #f2f2f2;
    font: bold 12px Arial,Helvetica,Sans-serif;
    color: #6A6F75;
    width: 160px;
    padding: 14px 17px 12px 30px;
    -webkit-border-radius: 5px 0px 0px 5px;
    -moz-border-radius: 5px 0px 0px 5px;
    border-radius: 5px 0px 0px 5px;
    text-shadow: 0 2px 3px #fff;
    -webkit-transition: all 0.7s ease 0s;
    -moz-transition: all 0.7s ease 0s;
    -o-transition: all 0.7s ease 0s;
    transition: all 0.7s ease 0s;
}
#searchbox input[type="text"]:focus {
background: #f7f7f7;
border: 2px solid #f7f7f7;
width: 200px;
padding-left: 10px;
}

#button-submit{
background: url(https://blogger.googleusercontent.com/img/b/R29vZ2xl/AVvXsEgiC6x5-NIHiRWWURDGlJuD33F7tMOi4r_eC2tgjDXF1fd73w02w03NYAi6aYK7qNJ8eQSPrI6B3axw73HDkzMTFDpAh5dFwcprJy7jwh90prG40mmuwRfcfPRnmTYP29U2wzychIWJ5p6G/s1600/slider-arrow-right.png) no-repeat;
margin-left: -40px;
border-width: 0px;
width: 43px;
height: 45px;
}
</style>

<form id="searchbox" method="get" action="/search" autocomplete="off">
<input name="q" type="text" size="15" placeholder="Enter keywords here..." />
<input id="button-submit" type="submit" value=" "/>
</form>
<style>
#searchbox {
    background: url(https://blogger.googleusercontent.com/img/b/R29vZ2xl/AVvXsEijwNi_wK-1FZl-dhaHKhULeEroQvCBRNsTEvrxCeo61D4N4FV5jvqDHmnjzEk_yBQTRPlpWiyf3VgHbSaKBpg2IOif6k02WaJa0EeQDIvL8LAA73h30dtDXtGdAmdmJAlz2ZouvL7eNDgy/s1600/searchbar.png) no-repeat;
    width: 208px;
    height: 29px;
}
input:focus::-webkit-input-placeholder {
    color: transparent;
}
input:focus:-moz-placeholder {
    color: transparent;
}
input:focus::-moz-placeholder {
    color: transparent;
}
#searchbox input {
    outline: none;
}
#searchbox input[type="text"] {
    background: transparent;
    margin: 3px 0px 0px 20px;
    padding: 5px 0px 5px 0px;
    border-width: 0px;
    font-family: "Arial Narrow", Arial, sans-serif;
    font-size: 12px;
    color: #828282;
    width: 70%;
    display: inline-table;
    vertical-align: top;
}
#button-submit {
    background: url(https://blogger.googleusercontent.com/img/b/R29vZ2xl/AVvXsEgB9h2yfPNNr13IaaP7jdTfXk1PEhcxIJocOT473nFcSqOio_v1_2h5xB4WYe7MKeg_VZX1ypQkqD-6Sor5zUIlboRFNpmUqXFiLIXOnhcoHin8YTMDfVDwlP6JMJD6dcxBEZlNbfVVPIkE/s1600/magnifier.png) no-repeat;
    border-width: 0px;
    cursor: pointer;
    margin-left: 10px;
    margin-top: 4px;
    width: 21px;
    height: 22px;
}
#button-submit:hover {
    background: url(https://blogger.googleusercontent.com/img/b/R29vZ2xl/AVvXsEjyYIpIgi9mbNi8_9HdByqdlZitfOD_xpye1z-Zmnz7brGhcruryL0kzejkN2dqwNUi1J0um2lZmVilyhziPwMY0kWz1cLpPBw7ikbe8DnLVWZClevKjfGHBjXKS57dcnW9anV4FJXjqQ30/s1600/magnifier-hover.png) no-repeat;
}
#button-submit:active {
    background: url(https://blogger.googleusercontent.com/img/b/R29vZ2xl/AVvXsEjyYIpIgi9mbNi8_9HdByqdlZitfOD_xpye1z-Zmnz7brGhcruryL0kzejkN2dqwNUi1J0um2lZmVilyhziPwMY0kWz1cLpPBw7ikbe8DnLVWZClevKjfGHBjXKS57dcnW9anV4FJXjqQ30/s1600/magnifier-hover.png) no-repeat;
    outline: none;
}
#button-submit::-moz-focus-inner {
    border: 0;
}
</style>

<form id="searchbox" method="get" action="/search" autocomplete="off">
    <input name="q" type="text" size="15" placeholder="search..." />
    <input id="button-submit" type="submit" value="" />
</form>
<style>
#searchbox {
    background: url(https://blogger.googleusercontent.com/img/b/R29vZ2xl/AVvXsEhJ0986KYH1W95bAs3U7xow4udNdU29UEYq72lbkPp_IcLm8XDlySJdCntWOSEMe_ZUqAa6FgPcIU4oHhyphenhyphensXfxae5dd-AHtYQubD1BF680xwGXXBc_UY4KYv4fLVNDaNNkeezO2mbwpyOeu/s1600/search-box.png) no-repeat;
    height: 27px;
    width: 202px;
}

input:focus::-webkit-input-placeholder {
    color: transparent;
}

input:focus:-moz-placeholder {
    color: transparent;
}

input:focus::-moz-placeholder {
    color: transparent;
}

#searchbox input {
    outline: none;
}

#searchbox input[type="text"] {
    background: transparent;
    margin: 0px 0px 0px 12px;
    padding: 5px 0px 5px 0px;
    border-width: 0px;
    font-family: "Arial Narrow", Arial, sans-serif;
    font-size: 12px;
    font-style: italic;
    width: 77%;
    color: #828282;
    display: inline-table;
    vertical-align: top;
}

#button-submit {
    background: url(https://blogger.googleusercontent.com/img/b/R29vZ2xl/AVvXsEgs2yS3rSsnDBVdWdFFMMGxY_kiPXFxgDUkQTq1U52xOhy-7m_DYidZmTzGdh2P13KLlhd5AX3qliMUncSgqXHyC2n1rAVI6cG_Bb4ZzIrXxFmKBW847y9GmEUzgbVW6gowkRgrBG3J0Lua/s1600/search-button.png) no-repeat;
    border-width: 0px;
    cursor: pointer;
    width: 30px;
    height: 25px;
}

#button-submit:hover {
    background: url(https://blogger.googleusercontent.com/img/b/R29vZ2xl/AVvXsEjWY6LKjO89l9J5mwohnun9VrOrCSk3cMHrasXyXlo_RnT3KwWlym4fjDNIjRKtubIhuR5cmQ9rdH8bWBqGzJgoPUNxv2KCzzJxquFWbt9ULzlmsx1nOC6Bt73SuoWIqRpEKp7BcI6c4dc0/s1600/search-button-hover.png) no-repeat;
}

#button-submit::-moz-focus-inner {
    border: 0;
}
</style>

<form id="searchbox" method="get" action="/search" autocomplete="off">
<input name="q" type="text" size="15" placeholder="search..." />
<input id="button-submit" type="submit" value="" />
</form>
<style>
#searchbox {
    background: url(https://blogger.googleusercontent.com/img/b/R29vZ2xl/AVvXsEjbB2gWbs479w8BeVifrGvb3mc3EcnoV8Yrb2HZy3LUSkOfxp4u18EIDhHwXqj0JenunIViVJY4LdBuhek0mmHbJhLEh79SXaSaAyIxi3u1H2G03wM6byAzugv86VbJ7rFVnnTzOHYDVy7b/s1600/search-box1.png) no-repeat;
    width: 250px;
    height: 65px;
}

input:focus::-webkit-input-placeholder {
color: transparent;
}

input:focus:-moz-placeholder {
color: transparent;
}

input:focus::-moz-placeholder {
color: transparent;
}

#searchbox input {
    outline: none;
}

#searchbox input[type="text"] {
    background: transparent;
    padding: 5px 0px 5px 20px;
    margin: 10px 15px 0px 0px;
    border-width: 0px;
    font-family: "Brush Script MT", cursive;
    font-size: 12px;
    color: #595959;
    width: 65%;
    font-weight: bold;
    display: inline-table;
    vertical-align: top;
}

#button-submit {
    background: url(https://blogger.googleusercontent.com/img/b/R29vZ2xl/AVvXsEgARobS_ppTkp_pywxxDywmCJsaxPXMoHt5U5AkNxjhLjF75O8mtyhMDAxPaOJHlhpVtzw4XqqxiIxxV8yMOTtk4aeZfYd_tAS3OH7m-4IfQKZxpqCPM04auOzejKuSxR2MMd0XNsuWCcEj/s1600/magnifier.png) no-repeat;
    border-width: 0px;
    cursor: pointer;
    margin-top: 10px;
    width: 19px;
    height: 25px;
}

#button-submit:hover {
    background: url(https://blogger.googleusercontent.com/img/b/R29vZ2xl/AVvXsEiL8JazWM9Whiw51ecRQDq52lL4wZ3KbVAZvaNa0QYOIY7LSlqAv_ftJDr-b917h-aFVCsNANJb6tOKqLN03_Jm_Uj1VAGQ3FBcqnYgWS-8ZTRPCt67uWmb2NNO2Z2KJfHayK3ScYY5zlGA/s1600/magnifier-hover.png) no-repeat;
}

#button-submit:active {
    background: url(https://blogger.googleusercontent.com/img/b/R29vZ2xl/AVvXsEiL8JazWM9Whiw51ecRQDq52lL4wZ3KbVAZvaNa0QYOIY7LSlqAv_ftJDr-b917h-aFVCsNANJb6tOKqLN03_Jm_Uj1VAGQ3FBcqnYgWS-8ZTRPCt67uWmb2NNO2Z2KJfHayK3ScYY5zlGA/s1600/magnifier-hover.png) no-repeat;
    outline: none;
}

#button-submit::-moz-focus-inner {
    border: 0;
}
</style>

<form id="searchbox" method="get" action="/search" autocomplete="off">
    <input class="textarea" name="q" type="text" size="15" placeholder="Search here..." />
    <input id="button-submit" type="submit" value="" />
</form>
<style>
#searchbox {
width: 280px;
background: url(https://blogger.googleusercontent.com/img/b/R29vZ2xl/AVvXsEgvijtOeSG7JWrAaAi2lyWDEg74rw1a3qZrrrejmpq1EOD37_J-qOEUpiDjSP81m5yLcj18o18SxYkMYzZ3mQlSww7s3-JKhPvpuupxSwiMf0-y0GnIbdo0K0JnRpY5vloT-FuJnQvVFfrT/s1600/search-box.png) no-repeat;
}

#searchbox input {
    outline: none;
}

input:focus::-webkit-input-placeholder {
    color: transparent;
}

input:focus:-moz-placeholder {
    color: transparent;
}

input:focus::-moz-placeholder {
    color: transparent;
}
#searchbox input[type="text"] {
background: transparent;
border: 0px;
font-family: "Avant Garde", Avantgarde, "Century Gothic", CenturyGothic, "AppleGothic", sans-serif;
font-size: 14px;
    color: #f2f2f2 !important;
    padding: 10px 35px 10px 20px;
    width: 220px;
}
#searchbox input[type="text"]:focus {
color: #fff;
}

#button-submit{
background: url(https://blogger.googleusercontent.com/img/b/R29vZ2xl/AVvXsEioToHhVXiq5NcO2PZ38GXd_Od2NpQ_PnEAuV1We4paxDmbqTOh8JfEbEalhH6T9INr1svKmbLG8aDzPj6lKzj-ZBrjGm5b_nD2UYMnRw0zIRWg-S9637TQRBK1lWn8jLjzg0P5U5FcbIFm/s1600/search-icon.png) no-repeat;
margin-left: -40px;
border-width: 0px;
width: 40px;
height: 50px;
}

#button-submit:hover {
background: url(https://blogger.googleusercontent.com/img/b/R29vZ2xl/AVvXsEjhnj8ghNLOoGlp4yyHHXjlv35JANgue8hAHmgJBfdNaylyBoxXYLGi7rIx3DVSZCONcSBdWEsB7QC6H1gdMgjmo8Nd0vX4wFfRPr45ejWcb2t7hQ_q2YPwQ18kQHgYRq9EhsXB5frqF264/s1600/search-icon-hover.png);
}
</style>

<form id="searchbox" method="get" action="/search" autocomplete="off">
<input name="q" type="text" size="15" placeholder="Enter keywords here..." />
<input id="button-submit" type="submit" value=" "/>
</form>

Steps: How to Add a Custom Search Box to Blogger

Step 1. Log in to your Blogger account, then go to Layout > click on the 'Add a gadget' link on the left side.

Step 2. Choose HTML/JavaScript from the pop-up window > paste the code of the search box inside the empty box.

Step 3. Press Save.

That's it!

There you have it, 6 stylish choices that will let you take advantage from all the great benefits of using a search box, while still helping you make your blog stand out. After adding your new search bar, your visitors will be able to navigate through your site and get to the same place using both the box and the navigation bar.

السبت، 6 سبتمبر 2014

How To Add an Instagram Widget in a Blogger Blog

If you're not familiar with Instagram, it's a photo-sharing network that can be downloaded to your smart phone as an application. Think of it as Facebook without the status updates. By developing a simple service that does one thing, and does it well, Instagram has become one of the most prominent photo sharing apps on the market.

The great thing about using Instagram is that it's not just for individuals. Businesses and non-profits alike can take advantage of this service to share their day and passions with their dedicated customers and fans. These fans number nearly 200 million active users a month, and approximately 7.3 million new daily posts. That's an astonishing number of potential new customers available for you to capture.

By adding Instagram on Blogger as a widget, you can unleash a new visual aspect of that site and allow visitors to go beyond just words on a page. With the convenience to carry the application around on your smartphone wherever you go, you can snap pictures, apply filters, and upload that content to your profile. From the profile, a widget specially designed for Instagram on Blogger would translate that data and display the image on your site. Even those visitors that aren't members of Instagram could benefit from such a service.

It doesn't matter what you are sharing. Whether you're the type of person that loves to share pictures of your dinner with the world, or business owner that loves showcasing their brand in everyday life, Instagram can work for you. Adding Instagram on Blogger as a widget also offers an incredibly accessible tool for stock photos to use in new posts.

This guide will explain how to add an Instagram widget to your site with step-by-step instructions. The design of your new Instagram widget is entirely customizable and will allow you to modify the background color, font, and how the widget is actually displayed on the site. When you're finished, you'll find that the Instagram widget will blend together effortlessly with your current theme and make your Blogger site truly stand out from the rest.
instagram widget in blogger

How to Add An Instagram Widget in Blogger

1. To get the Instagram widget, access the Intagme website here: http://www.intagme.com/

2. Type in your username > select Grid or Slideshow:

instagme username setting

3. Select the Thumbnail size of your images (100px is the default) and choose if you want a border around your Photos or not

instagram widget thumbnail

4. To change the Background Color, simply click on the empty box and pick your favorite color

instagram background color

5. If you want to show the Sharing buttons on your widget, select 'Yes', otherwise, click 'No'.

6. Once you're satisfied with the widget, press the "Get Code" button and copy your code.

instagram sharing buttons
7. Log into your Blogger account and select your blog > navigate to Layout and click on the "Add a Gadget" link on the right side:

adding instagram to blogger

8. In the pop-up window, scroll down and click on the "HTML/JavaScript" gadget:

add html javascript gadget

9. Paste the code that you got from the Instagme website into the content section and press the 'Save' button to save the widget.

instagram code to blogger

10. Click and drag your widget if you want to change its position and press the "Save Arrangement" button on the upper right side.

blogger save arrangement

And that's it! Now you have your very own Instagram widget on your Blogger blog to share new photos with visitors, and provide just a glimpse of your life when you're away from the computer. To change or add any of the photos that are displayed in the widget, you'll have to go directly through the app itself, or log on to your account via Instagram's website.

Once you're ready to show off your new work, let all your customers or fans know by posting a Facebook link to the site or a tweet about the changes and asking them to follow you. Just make sure that you've added a few photos before making the announcement, so that they have something to look at. After they access your widget, they can like your new photos and interact with you in entirely new ways.

الخميس، 4 سبتمبر 2014

How To Host Blogger CSS and JavaScript Files in Google Drive

Anyone that has ever worked on a web design or development can tell you that where you decide to store your files is important. Every time someone visits your site, the server or host will access this location and bring up the relevant files that need to be displayed. Wherever you decide to store your files, this will have an impact on some important aspects like the speed that your site loads, your overall SEO ranking and your ability to make necessary adjustments to the site.

Things To Think About

When you are designing your online structure and where to store your important CSS and JavaScript files, here is a run down on how this decision might impact your site later on:

Site Loading Speed

By combining some of the style sheets and website files, the Blogger server only has to collect information from a single location. When you split up your files or decentralize the file system, it takes a longer time for all the data to come together to make your site possible.

Slow loading speeds can negatively impact your SEO ratings because the slower the site is, the less likely that visitors are going to wait around for it to load. If someone visits your site and immediately clicks the 'back' button because it's taking too long to load, that is going to increase your bounce rate and provide Google with statistics that show your site is either low quality or irrelevant to the search keywords.

File Storage Affects SEO

In addition to increasing your bounce rate, storing your files in a central location and managing the name of your files can affect SEO site wide. Web crawlers enlisted by Google, or some of the other search engines, index both the code on your site, and the name and directory of your files. If file names are random or not placed in the proper categories, the web crawlers aren't going to know what to do with the information.

Clear file structure and a central location provide you with incentive to organize everything and name them appropriately. All the content that is relevant to the subject of your website or blog will be in the same location for web crawlers to review.

Storage Locations Affect Editing Abilities

Shuffling through files and folders or opening up FTP connections just to make some simple edits can be a hassle, and take up a lot of time that could have otherwise have been spent writing new content.

If you're a Blogger site owner, this is something you need to think about. When you need to make alterations to things like social media sharing buttons, popular posts, recent posts and related posts widgets, you have to know where everything is intended to go, or risk losing both available content and money.

Some of the larger sites that produce hundreds of unique articles each month can't afford to have content in different locations. When articles start to get lost out of order, they run the risk of duplicating content on their site, or forgetting to post it altogether. Things should be right at your fingertips to minimize mistakes and reduce the amount of time spent editing the site while it's still live.

Storing Javascript/CSS Files With Google Drive

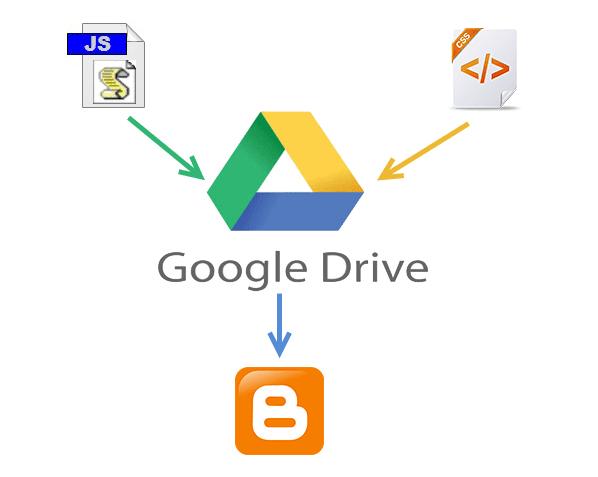
Storing Blogger CSS and JavaScript files with Google Drive will help to eliminate any of the problems mentioned above and reduce the clutter among your services. Taking this method can increase your site speed, increase the opportunities for a successful SEO campaign, and make your life so much easier.

Google Drive provides ample amount of space to store large files, and offers collaboration services so that you can work among different team members on the same project. Some of the files that you upload into the cloud services can remain unpublished and stay within the private site, whereas other files like blog posts can be published or stored to the public site.

Another beneficial feature of storing all your Blogger files on Google Drive is that it is highly secure. Google comes with the backing of one of the leading companies in the technical world so that you can be sure your content is safe from hackers and those looking to compromise your site.

This guide will provide you with step-by-step instructions on how to setup your Blogger site using Google Drive. It's completely free to take advantage of this strategy, and will provide you with a solid platform from which to build your blog.
host blogger css javascript files

Step 1. Prepare the CSS/JavaScript Files

  • First, we need to create the file that we need to host. To host a CSS file, open the Notepad and paste the CSS code (if it is enclosed within the <style> and </style> tags, remove them). 

  • In the Notepad menu, select 'File' > 'Save as' and type the file name with the .css extension just like I did with mycssfile.css - see the screenshot below.
create a css file
  • In the same window, choose "All files" in the "Save as type" option and set the Character Encoding to UTF-8. 

  • If you want to host a JavaScript file, add the .js extension (instead of .css) at the end of your file name (remove the <script>...</script> tags if you see them). Click "Save" and navigate to the location where you want to save the file. 

Step 2. Upload Your File on Google Drive

  • Access https://drive.google.com and log in with your Gmail account. After you logged in, click on the 'Create' button and add a new separate folder to upload your JavaScript and CSS files.

create folder in Google drive
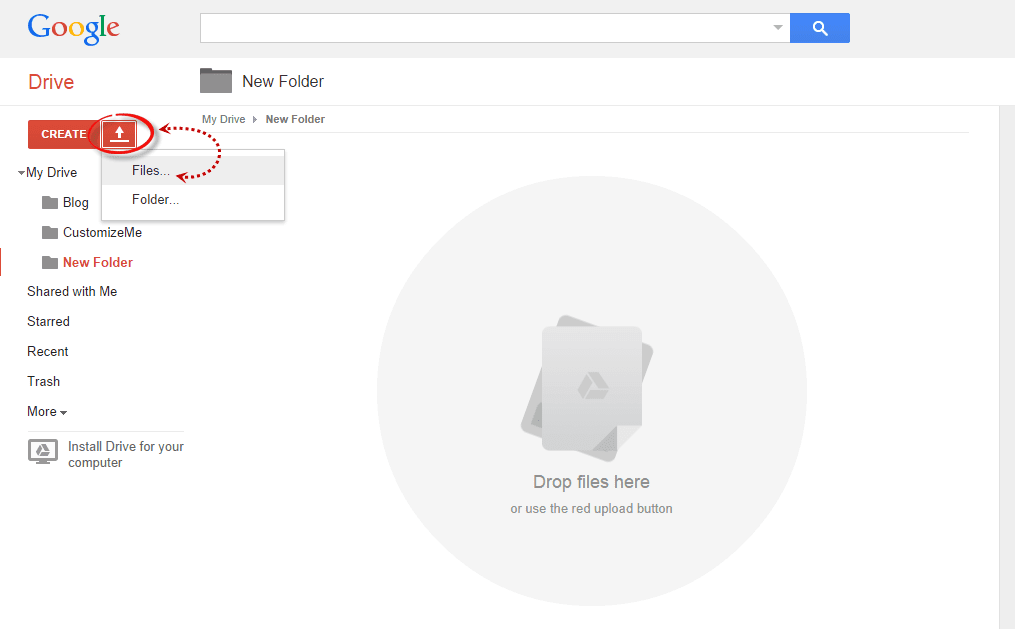
  • Open the newly created folder, and click on the Upload button with the upward arrow to choose the files that you need to upload.

upload files using google drive
  • Now, navigate to the location where you saved the files, select them (to select multiple files, press and hold down the Ctrl key on your keyboard and then click on them) and press the Open button.
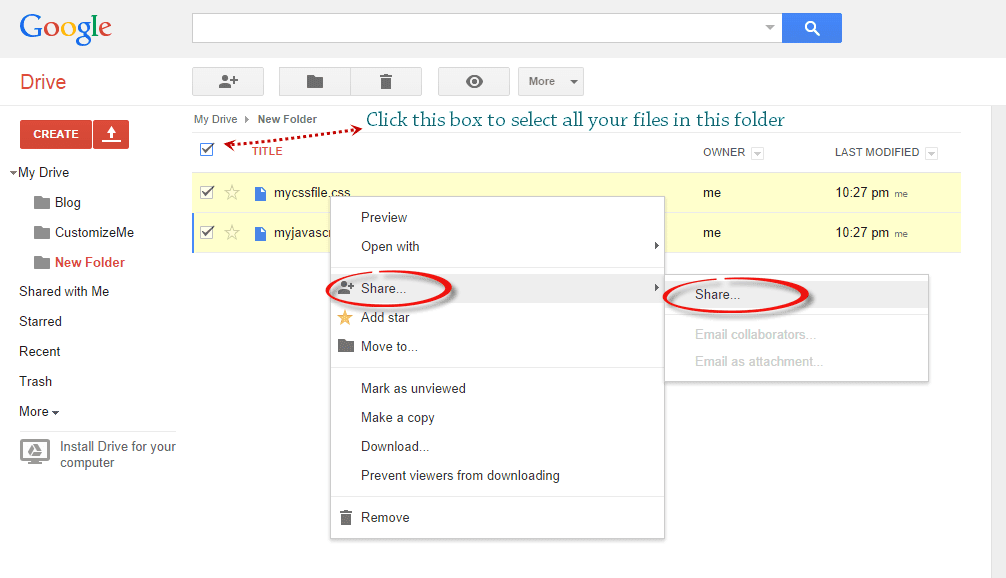
  • After the files have been successfully uploaded, right click on the file names (to select all your files in the folder, click on the checkbox) and select 'Share':

share google drive files
  • In the 'Sharing settings' window, click on the 'Change' link and choose the 'Public on the web' option. Press 'Save' and copy the link(s) of your uploaded file(s) from the 'Links to share' box highlighted in blue, then paste it into a Notepad to use it later.

javascript css file sharing

Step 3. How to Add an External CSS/JavaScript file to Blogger

Before you can use the links, you must replace 'https://drive.google.com/file/d' to 'https://googledrive.com/host' and remove '/edit?usp=sharing' in the link.

For example, the link to mycssfile.css that I copied looks like this:
https://drive.google.com/file/d/0B4n9GL3eVuV-TkphMkc3SFR2Slk/edit?usp=sharing
Notice the part in blue after the "/file/d/" part. That is the file ID which is used to access it via the new hosting service. It should start with the following URL:
https://googledrive.com/host/
Add the file ID like this (remove the '/edit?usp=sharing' part):
https://googledrive.com/host/0B4n9GL3eVuV-TkphMkc3SFR2Slk
Now log into your Blogger account, select your blog and go to Template > Edit HTML. Click anywhere inside the code area and press the CTRL + F keys to open the search box:

open blogger search box

If you want to add a CSS file, type the following tag inside the search box and hit Enter to find it:
<head>
Just BELOW the <head> tag, add this line:
<link rel="stylesheet" type="text/css" href="https://googledrive.com/host/0B4n9GL3eVuV-TkphMkc3SFR2Slk" />
And replace https://googledrive.com/host/0B4n9GL3eVuV-TkphMkc3SFR2Slk with the link of your CSS file:

add external css to blogger

If you want to add a Javascript file, search for the following tag:
</body>
And add this line just ABOVE it:
<script src='https://googledrive.com/host/0B4n9GL3eVuV-eVYwLXBrTlZrVDg' type='text/javascript'></script>
Replace the line in blue with your URL:

add external javascript js to blogger

Finally, press the 'Save template' button to save the changes. And you're done!

In Conclusion

Once you have successfully saved all your file folders and closed out of the drive. Open your site in a browser and make sure that all the changes have completed successfully.

Next time you want to edit any of the information or move internal files, all you have to do is open up the Google Drive folder on your account and make the modifications from that location. Those files will then automatically sync to the online folder and make updates to your site. This works the same if you want to change the appearance by modifying the CSS code to extend the header, footer, or make customizations.

As you can see, changing your file storage out so that is CSS and JavaScript is stored on your Google Drive account is easy to do and only takes a few minutes. After you make the change, you can begin benefiting from faster loading speeds, higher SEO rankings, and overall a more convenient platform to work from to increase the efficiency of your work.

الاثنين، 1 سبتمبر 2014

How To Upload and Use Custom Fonts in Blogger

Just about anyone can write and publish his or her own blog. In fact, there are about 152 million blogs out there on the internet. But, if you want your blog to stand out you need to impress visitors with the little things. You need to be able to catch there attention and keep it so that they want to come back.

Complementing your blog post with images, links, and catchy titled is a great way to start and should be something you practice on just about everything you post; however, don't just stop there. If you really want to impress people and draw attention toward your blog, you want to start where the content all begins. You need to make use of custom fonts in Blogger. This guide will help you learn a little bit about font styles and how to upload new fonts onto your Blogger site.

The Different Types of Font

Before you can upload any font files, you need to find the right font and typeface that will fit your style. Typeface is the design and symbols used for the letters; font is the actual characters. Some of the most common typeface terms that you should probably be familiar with before starting are:

  • Serif - distinguished by small decorative lines that are attached to the end of letter strokes; best used for the paragraph or body content.
  • Sans-serif - modern looking letter strokes that lack the decorate lines at the end; instead the letter end abruptly.
  • Script - a handwriting typeface that looks like cursive letters or custom strokes.
  • Display - typeface that is designed to stand out from the rest of the page; characterized by a broad and unique use of informal letter designs and transparency. Display typeface is best used on titles and headers.

Within each web browser there are also certain types of font files that are used. Most of the browsers, except Internet Explorer and the iOS browser, will use TTF font file. Internet Explorer is the only web browser service that uses EOS files, and Apple has opted for using an SVG for their mobile and tablet based products. Some custom fonts in Blogger have to be in an @Font-Face kit, but this will be discussed later on.

Where to Find Font

You can find custom font all over the internet when you're ready to get started. Some custom fonts in Blogger are free to use and can be downloaded to your computer, others you are considered 'premium' and you have to pay to use them, so please check twice whether they are having Commercial or Personal licenses. Google offers its own font service known as Google Web Fonts which can be a good place to start looking around for custom fonts in Blogger.

Using the Google Web Fonts service, you run a filter to find select fonts based on width, thickness, and slant. Better yet, you can test out how using the custom fonts in Blogger would appear by modifying the size, and viewing it in a small display window. If you like a couple different fonts, you can save them to your collection to come back to later.

Adding a Custom Font to Blogger from Google Web Font

Step 1. To browse the Google Fonts library, access www.google.com/webfonts. There are 650 font families in the collection right now, and they keep adding more, so you may want to sort them.

To organize the fonts by style, you can use the menu on the left side. The top menu lets you to add and preview your own text using the 'Preview Text' field. From the same menu, you can pick the 'Size' and sort the fonts in 'Alphabetical order', by 'Date added', 'Number of styles' and 'Popularity':

google web fonts

Step 2. Once you decided what font you want to use, click on the 'Add to Collection' button and then hit the 'Use' tab. This will take you to the 'Almost done!' page that will give you a link to the style sheet found in the 'Standard' tab (point 3) and the CSS style (point 4).

The link to style sheet would look like this:
<link href='http://fonts.googleapis.com/css?family=FONTNAME' rel='stylesheet' type='text/css'>
And the CSS style would look like this:
font-family: 'FONTNAME', cursive;

google fonts CSS

Step 3. Now that you have selected the fonts and have a general understanding of the different types of fonts available, you can head over to your Blogger blog. Open up the Dashboard and make sure that the first thing you do is to create a backup of your template: go to Template and press the "Backup/Restore" button on the upper right side. That way, you can revert the changes back to the original in case something goes wrong. 

Step 4. From the same "Template" location, press the "Edit HTML" button:


Step 5. Click anywhere inside the code area and press CTRL + F at the same time (PC) or Command + F (Mac) to open the Blogger' search box and type <b:skin> inside the search box. Press Enter and it will take you to the <b:skin> tag, which will be highlighted in yellow:

adding custom font to blogger
Step 6. Directly above the <b:skin> tag, copy & paste the link to the style sheet provided by Google Web Fonts (step 2). To prevent any errors, add a forward slash (/) right before the closing angle bracket (>), like this:
<link href='http://fonts.googleapis.com/css?family=FONTNAME' rel='stylesheet' type='text/css' />
Step 7. To apply the font on a specific part of our blog, we'll need to find the CSS selector and add the CSS style (point 4) just AFTER the curly bracket. If you don't know how to find the id/class selector, please read this tutorial: Add CSS rules to Design a Blogger blog using Firebug

For example, if I would want to add the "Rancho" font to the posts and comments titles, I will paste the CSS style like this:
h3.post-title, .comments h4 {
  font-family: 'Rancho', cursive;
  font-size: 28px;
}
Where "h3.post-title, .comments h4 {" is the class selector for the post and comments titles. Note: to change the size of your font, add the "font-size: 28px;" part as well, and change the "28px" value to make the font bigger/smaller.

custom font to blogger titles

You can also add the same CSS to "Template" > press the "Customize" button the right side, navigate to "Advanced" > "Add CSS" tab and paste the CSS code in the empty box.

css, blogger template designer

Step 8. Finally, press the "Save Template" button and you're all set!

Using a Custom Font that isn't on Google Web Fonts

Some of the good places to find free fonts are DaFont, FontSquirrel and UrbanFonts. Click to download the kit (unzip it if necessary), and save the TFF or OFT file on your desktop.

fontsquirell download font

Step 1: Convert the Font File

The font file that you've downloaded is most likely in a TFF or OFT file since this is the most popular type. You need to convert this file into a @Font-Face kit. Many online services can help you do this, but here are two recommended sites:


If you are using the Font Squirrel Webfont Generator: press the "Add Fonts" button, choose the font file that you saved on your desktop and check the "Yes, the fonts I'm uploading are legally eligible for web embedding." checkbox. After the font has been successfully uploaded, click the "Download your kit" button.

font squirrel webfont generator

This should open the kit containing 4 formats of fonts (inside the fonts folder), a CSS stylesheet & the html file for the demo page. The only files that you need to extract are the ones with the .woff, .tff, .svg, .eot extension and the stylesheet.css file.

webfontkit rar file

Step 2: Upload The Font Files To Blogger

Custom fonts in Blogger have to be uploaded before you can use them. For this, we are going to use Dropbox and upload them to Public folder (upload only the files with the .woff, .tff, .svg and .eot extension).

upload fonts using dropbox

Once you've uploaded them, copy the Public URL's of all 4 fonts: right click on each file, choose "Copy public link..." and press the "Copy to clipboard" button. Paste each link separately in a Notepad, so that you can link to that location later.

copy public link in dropbox

Next, open up the stylesheet.css file that came with the kit and it will show you a similar code:
/* Generated by Font Squirrel (http://www.fontsquirrel.com) on September 2, 2014 */

@font-face {
    font-family: 'fontname';
    src: url('font-name.eot');
    src: url('font-name.eot?#iefix') format('embedded-opentype'),
         url('font-name.woff') format('woff'),
         url('font-name.ttf') format('truetype'),
         url('font-name.svg#fontname') format('svg');
    font-weight: normal;
    font-style: normal;
}
Edit the link location to point toward the font file that you just uploaded to the Dropbox Public folder and pay attention to each extension which should correspond with that found in the stylesheet.css file.

For example, if you uploaded the font .tff file with this name:
https://dl.dropboxusercontent.com/u/62316253/amatic-bold-webfont.ttf
...change the CSS link in blue in this line:
url('font-name.ttf') format('truetype'),  
to point to:
url('https://dl.dropboxusercontent.com/u/62316253/amatic-bold-webfont.ttf') format('truetype'),
After you've added all the links, copy the stylesheet.css code that you modified to your clipboard.

Step 3: Editing Blogger's CSS

Open up the CSS on your Blogger site. This can be found by navigating to Template > Edit HTML. Next, click inside the code area and press the CTRL + F keys to open the search box, then type the tag below and hit Enter to find it:
]]></b:skin>
Just ABOVE this tag, add the code that you copied in the stylesheet.css file.

custom face fonts in blogger

Finally, we need to declare the custom font using CSS. For example, if I want to change the font of the post title, I will add the line in red from above, just below the "h3.post-title, .comments h4 {" CSS selector:
h3.post-title, .comments h4 {
font-family: 'fontname';
font-size: 28;
}
Obviously, the fontname will be the actual name of the font. This will make sure that your blog can use the custom fonts in Blogger. After we've made these changes, press the "Save Template" button and exit.

Step 4: Test Out the Site

Navigate back to your sites homepage and you should now see the custom fonts in Blogger that you uploaded during the last few steps. Every time you go to make a new post, the site will now be able to use your font.

In Conclusion:

Website design is an important part to maintain a successful blog. As a blog owner, you are responsible for providing content that isn't just fun to read, but looks good. Modifying the font is just one easy way that you can help your blog stand out without making any major changes to your blog itself.

Do you have any other methods for adding custom fonts? Let us know by leaving a comment below!